How to filter database records using dropdown in Laravel

In this post we will learn how to filter database records using dropdown.
Steps:
Step 1: Install Laravel and Create Application
Step 2: Install Yajra datatable package
Step 3: Config database credentials in .env file
Step 4: Migrate database
Step 5: Create Controller
Step 6: Create blade view file
Step 7: Create Routes
Step 8: Run application
Install Laravel and Create Application: First create new application using below mention composer command.
composer create-project --prefer-dist laravel/laravel filterdata
Get in application
cd filterdataInstall Yajra datatable package
Now, We have to install Yajra datatable Package, run below mention composer command to install Yajra package.
composer require yajra/laravel-datatables-oracle
Now config/inject Yajra class inside providers and alias array using config/app.php
    'providers' => [
        Yajra\DataTables\DataTablesServiceProvider::class,

    'aliases' => [
        'DataTables' => Yajra\DataTables\Facades\DataTables::class,
Config database credentials in .env file
Now config database credentials and run migrate command
DB_CONNECTION=mysql
DB_HOST=127.0.0.1
DB_PORT=3306
DB_DATABASE=filterdata
DB_USERNAME=root
DB_PASSWORD=
For filter data we have to add one column in users table “status” column, create a one migration file for add status column using below artisan command.
php artisan make:migration add_status_column<?php
use Illuminate\Database\Migrations\Migration;
use Illuminate\Database\Schema\Blueprint;
use Illuminate\Support\Facades\Schema;
class AddStatusColumn extends Migration
{
/**
* Run the migrations.
*
* @return void
*/
public function up()
{
Schema::table('users', function (Blueprint $table) {
$table->boolean('status')->default(0);
});
}
/**
* Reverse the migrations.
*
* @return void
*/
public function down()
{
//
}
}
Run migrate artisan command for migrate your tables in database
php artisan migrate
Add some dummy data
We have to add some dummy data for testing filter, we can use seeder,factory and tinker
php artisan tinker
User::factory()->count(350)->create()

Create Controller:
Now create controller for write our logic inside controller function, using below mention atisan command we can create controller
php artisan make:controller UserController
<?php

namespace App\Http\Controllers;

use Illuminate\Http\Request;

use App\Models\User;
use DataTables;

class UserController extends Controller
{
    public function index(Request $request){

        if ($request->ajax()) {
            $data = User::select('*');
            return Datatables::of($data)
                    ->addIndexColumn()
                    ->addColumn('status', function($row){
                         if($row->status){
                            return '<span class="btn btn-outline-success mb-0">Active Users</span>';
                         }else{
                            return '<span class="btn btn-outline-danger mb-0">Deactive Users</span>';
                         }
                    })
                    ->filter(function ($instance) use ($request) {
                        if ($request->get('status') == '0' || $request->get('status') == '1') {
                            $instance->where('status', $request->get('status'));
                        }
                        if (!empty($request->get('search'))) {
                             $instance->where(function($w) use($request){
                                $search = $request->get('search');
                                $w->orWhere('name', 'LIKE', "%$search%")
                                ->orWhere('email', 'LIKE', "%$search%");
                            });
                        }
                    })
                    ->rawColumns(['status'])
                    ->make(true);
        }
        return view('users');
    }
}
Create blade view file
Now create blade view file inside resources/views/users.blade.php
<!DOCTYPE html>
<html>
<head>
    <title>Filter Database Records - Blogahub.co.in</title>
    <link href="https://cdn.datatables.net/1.12.1/css/dataTables.bootstrap5.min.css" rel="stylesheet">
    <link href="https://cdnjs.cloudflare.com/ajax/libs/twitter-bootstrap/5.1.3/css/bootstrap.min.css" rel="stylesheet">
    <script src="https://ajax.googleapis.com/ajax/libs/jquery/1.9.1/jquery.js"></script>
    <script src="https://cdn.datatables.net/1.12.1/js/jquery.dataTables.min.js"></script>
    <script src="https://cdn.datatables.net/1.12.1/js/dataTables.bootstrap5.min.js"></script>
</head>
<body>
    <div class="container">
        <div class="bg-light p-4 text-center">
            <h2 class="text-black m-0">Filter Database Records - Blogahub.co.in</h2>
        </div>
        <div class="card my-2">
            <div class="card-body">
                <div class="form-group">
                    <label><strong>Filter by Status :</strong></label>
                    <select id='status' class="form-control" >
                        <option value="">Select Status</option>
                        <option value="1">Active</option>
                        <option value="0">Deactive</option>
                    </select>
                </div>
            </div>
        </div>

        <table class="table table-bordered data-table my-2">
            <thead>
                <tr>
                    <th>Sr no.</th>
                    <th>Name</th>
                    <th>Email</th>
                    <th>Status</th>
                </tr>
            </thead>
            <tbody>
            </tbody>
        </table>
    </div>

    <script type="text/javascript">
        $(function () {
            var table = $('.data-table').DataTable({
                processing: true,
                serverSide: true,
                ajax: {
                    url: "{{ route('users.index') }}",
                    data: function (d) {
                        d.status = $('#status').val(),
                        d.search = $('input[type="search"]').val()
                    }
                },
                columns: [
                    {data: 'id', name: 'id'},
                    {data: 'name', name: 'name'},
                    {data: 'email', name: 'email'},
                    {data: 'status', name: 'status'},
                ]
            });

            $('#status').change(function(){
                table.draw();
            });
        });
    </script>
</body>
</html>
Create route
Create routes inside web.php for accessing your filter page.
<?php

use Illuminate\Support\Facades\Route;
use App\Http\Controllers\UserController;
/*
|--------------------------------------------------------------------------
| Web Routes
|--------------------------------------------------------------------------
|
| Here is where you can register web routes for your application. These
| routes are loaded by the RouteServiceProvider within a group which
| contains the "web" middleware group. Now create something great!
|
*/

Route::get('/', function () {
    return view('welcome');
});

Route::get('users',[UserController::class,'index'])->name('users.index');
Run Application
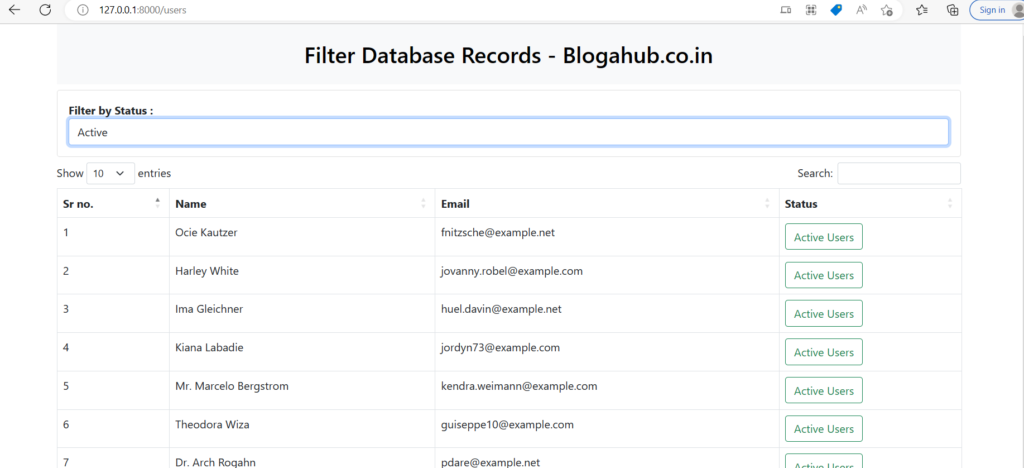
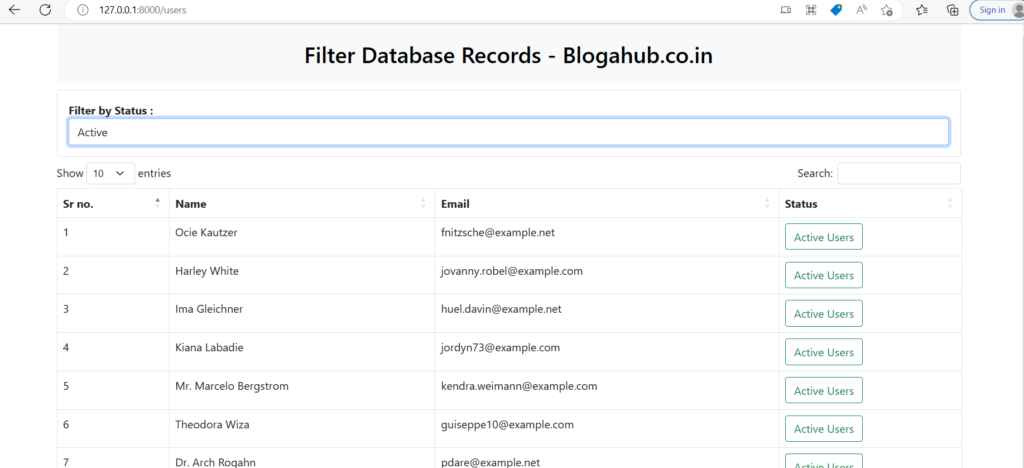
php artisan servehttp://127.0.0.1:8000/users


